Friday, November 14, 2008

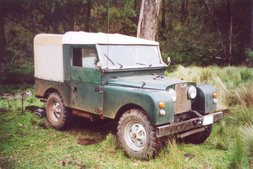
Grover Moves House

Shortly after the rebuild, we moved into a
house that we had bought just before christmas.


Yes, that was the incentive to finnish the
Grover during Christmas.


And folks, it was absolute bliss, driving grover
to the new house, rather than towing the
rolling chassis on a trailer!!


Grover's Garage is Multipurpose...


Theres plenty of room to work on whatever it is that
needs atention. (Because it's British, thats quite alot)!


And theres plenty of room for boulderation.
Cant do both at the same time, although, boulderation in
the garage, does encourage bloky talk of greasy, grimy
storys of battered knuckles. broken machinery, and
dream modifications.


As luck would have it, I sold the donar chassis
AFTER we moved house.


The buyer is using parts of the chassis to repair another
series one, so he asked me to slice and dice.


I did all the chopping with one wheel! Only Just!


This is what a rover would look like if ordered from Ikea!


Once settled into the new house, the restoration continues...


First to be adding shock absorbers!


Then to be replacing tie rod ends!


Cant believe those old ones even worked at all!!


Then to replace the stocking over the carby with a rover
oil cleaner. This was the only place it would fit, and after
a day screwing arround, I gave up, in favor of...


RAMFLOW!


When fitting Ramflow, make sure the gasket hole lines up!


Here my lovely asistant points at said hole!

Its some sort of presure thing.

Car wont start if this hole is blocked!


Finnished Product! Super easy to fit!
Apart from the 30 minutes it took to work out
that we put the gasket on back to front.. =(


Grover has a roof! It had been in storage for a while.


I am super happy that the new house has a rock
wall I can drive up. Picture doesnt realy do this justice.


Man and Machine, enjoying their new home!

Monday, November 10, 2008

Belated Christmas Cheer

This is an important post!
So lets all forget for a moment that its 6 months out of date.
Because... yes folks... thats right....

GROVER HAS BEEN REBORN!!!! =)

Lets take a look at the festivities that consumed me during the christmas break of 2007!

Since Grovers Wiring loom was only good for the bin, I set about making a new one. The whole thing is in visio, so I can refer back during the next rebuild...

Doesnt the dash look awesome!
It used to look a bit like a birdsnest.
A birdsnest that most of the eggs had fallen through because it was so crap!

Once installing the loom through the firewall grommits I had to solder the otherside in the engine bay temporary solder station!

Doesnt the finnished fuse block look awesome!
My secret, trailer wire!

The indicator stalk is original... and needed some TLC.

Finnished product, with horn pressing thingy.

This old Zenith 175CD carby leaked on a previous test run.


So I swapped it with another I picked up on Ebay!
Check out the stocking air cleaner
(the original fell apart in the swap)

Heres the modified steering column studs.
Where are they going Neil?? No-Where! =)

Here you can see the extra steering bracket Ive mounted.
Its a damn site more ridgid.
This is from a SII.
It stops the steering column twisting like a twisty thingy...

I forgot to change the steering tie rod ends...
...add to the list of things to do on the next rebuild!

By this stage, I'm on a Mission!

Grab a couple of bolts...

Bribe a few mates with beer and vegimite sandwiches!!

Throw the tub on in roughly 2 minutes!

Then spend roughly 60 minutes trying to get the bolts through the holes blocked by the fuel tank!!

Then throw the seats in!

Dont worry bout the floor pan!
Its retro cool to be able to grab the tail shaft from the driver seat!

Foot pedals are a good idea!

Windscreen and fender!!
Looking like a Grover Now!!
(The one-way sign is pointing at the laundry... oops)

One last Fender, a couple of doors, and a bonnet.
I reccon she'll go!


But before the maden Voyage, best to pack a couple of tools! =)

Grovers first trip will go down in history!
To the curry shop for a hot indian vindaloo please!!
And on said trip, only one problem!
Fanbelt needed tightening!!

Who said an IT nerd couldnt build a car!!

Thanks B for helping pull Grover apart, so many years ago!
Thanks Dan, Neil, Damo and Alan for drinking my beer.
Thanks Colleen for not complaining that the house smells of diff oil.
Thanks MrB and Mr Bump for your wise judgement...
(but i decided to go with the Lucas parts anyway) ;-)

And thanks to Grover, for not giving up on me.
I hope she'll be as kind to me when my chassis is all clapped out!

Sunday, January 6, 2008

Sunday Afternoon Sweat Fest

A whole stack has been happening, so heres
a brief run through...

After contemplating putting hundreds of odd
sized bolts back on Grover, I tossed that idea
out the window, and bought 150 bucks worth
of bolts. None of which ate BSF!! All standard
heads. The killer was the 2x Stainless 8 inch
bolts for the firewall, 25bucks each!! Ouch!!


Lucas, prince of darkness, made this smashing
starter motor!!


Heres the hole it sits in, thats a massive cog to
turn, good thing its a sturdy lucas!! =D


Lucas fitted nicely back in its home, with a good
coating of loctite gasket maker.


Heres a close up of the clean and painted gearbox
mounts and drum handbreak.


Front engine mounts have fresh paint and new
rubber as well.


Ive put the original muffler back on. New bolts
and some muffler gasket cement keep the fumes in.


Neil shouldnt have comented on the state of the
prop shafts, or my grease gun... he got the job of
cleaning and greasing them both.
Great job Neil. You earned the beer! ;-)


I couldn't convince Neil to install the prop shaft's though.


No worries, easy to install without the body panels!!


Next the freshly painted fuel tank gets installed.
The jack helped to lift it into the tight spot.
It was even tighter with a thin rubber strip at each
end to protect rubbing and rust holes!!


Here's the fuel tank installed, and if you look
close you can see the rubber strips.


Fan, Alternator and fanbelt installed!! YAY! =D


Installing the master cylinder was a fiddly job.
The copper pipes were not quite bent the right way.
Brakes are bled, ready to roll!! =D


I made sure to check that the break peddals fit
before greasing everything! Good job, since they
didnt quite fit, and i had to do some extra
dismantling and replace a few split pins.


But in the end, everything fit nicely! =D


I needed to make a pin for the clutch pedal, the
original broke! =( Considering i dont have a drill
press, Im happy that i got the split pin hole straight.


Here you can see the new pin on the left. Nickel
anti seize on the shaft may help prevent snapping
on next removal. Fingers crossed!


Next the radiator goes on, and after fiddling with
the hoses, filling with anti freeze will ensure no
frozen block in the extreeme Australian Winter.... =D


Next Damo fills the fuel tank so we can test the
electric fuel pump, no problemo!! =D


Then, after finding the distributor cap, solenoid,
coil and battery cables.... and then figuring out
where to plug them in.... I pushed the start
button..... She turned over a few times, then
chug-chug-chuggedy-chug.... Grover was alive!!


Now for the firewall, wireing loom and body pannels!!

This is a super happy day! Not long now folks!! =D