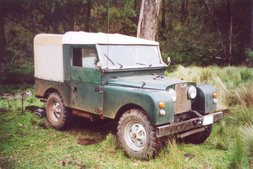
Sunday, January 6, 2008

Sunday Afternoon Sweat Fest

A whole stack has been happening, so heres
a brief run through...

After contemplating putting hundreds of odd
sized bolts back on Grover, I tossed that idea
out the window, and bought 150 bucks worth
of bolts. None of which ate BSF!! All standard
heads. The killer was the 2x Stainless 8 inch
bolts for the firewall, 25bucks each!! Ouch!!


Lucas, prince of darkness, made this smashing
starter motor!!


Heres the hole it sits in, thats a massive cog to
turn, good thing its a sturdy lucas!! =D


Lucas fitted nicely back in its home, with a good
coating of loctite gasket maker.


Heres a close up of the clean and painted gearbox
mounts and drum handbreak.


Front engine mounts have fresh paint and new
rubber as well.


Ive put the original muffler back on. New bolts
and some muffler gasket cement keep the fumes in.


Neil shouldnt have comented on the state of the
prop shafts, or my grease gun... he got the job of
cleaning and greasing them both.
Great job Neil. You earned the beer! ;-)


I couldn't convince Neil to install the prop shaft's though.


No worries, easy to install without the body panels!!


Next the freshly painted fuel tank gets installed.
The jack helped to lift it into the tight spot.
It was even tighter with a thin rubber strip at each
end to protect rubbing and rust holes!!


Here's the fuel tank installed, and if you look
close you can see the rubber strips.


Fan, Alternator and fanbelt installed!! YAY! =D


Installing the master cylinder was a fiddly job.
The copper pipes were not quite bent the right way.
Brakes are bled, ready to roll!! =D


I made sure to check that the break peddals fit
before greasing everything! Good job, since they
didnt quite fit, and i had to do some extra
dismantling and replace a few split pins.


But in the end, everything fit nicely! =D


I needed to make a pin for the clutch pedal, the
original broke! =( Considering i dont have a drill
press, Im happy that i got the split pin hole straight.


Here you can see the new pin on the left. Nickel
anti seize on the shaft may help prevent snapping
on next removal. Fingers crossed!


Next the radiator goes on, and after fiddling with
the hoses, filling with anti freeze will ensure no
frozen block in the extreeme Australian Winter.... =D


Next Damo fills the fuel tank so we can test the
electric fuel pump, no problemo!! =D


Then, after finding the distributor cap, solenoid,
coil and battery cables.... and then figuring out
where to plug them in.... I pushed the start
button..... She turned over a few times, then
chug-chug-chuggedy-chug.... Grover was alive!!


Now for the firewall, wireing loom and body pannels!!

This is a super happy day! Not long now folks!! =D

Thursday, January 3, 2008

Ho-ho-ho and Rub-a-dub-dub

Grover has a new battery boys and girls!


Don't you just love it when the new water pump
you bought doesn't come with the bolts, and the
thread is different to the old one!! Why is it that
these things are only discovered After the shops
have shut for the night!! I guess the neighbors
are happy, coz its 930pm!! =D


Break lines are almost done, again, a bolt
problem, cant find where I put them!! =(


Ive replaced the 3 break lines with new ones.
No cracks in the flexi hose is good for stopping!
Check out the tiny break cylinder!! Its so cute!


Fuel tank is all painted ready to go in! =)


If I'm really lucky, she may start this weekend!!

HOORAY!! =D

Friday, December 28, 2007

Turning Point

Today has been a long time coming.
A great day for all man kind!
A corner was turned.
Yes folks you guessed it...

BAH-BAH-BAHAHAAAAAH...

Project Grover Rover has commenced the rebuild!!

YIIPP-YIPPY-DOO-DIDDLY-DEEE-DAH!!! =D

With the combined brain power of Dodgy Dan, Bush
Tucker Dad, and Oober Nerd himself, today were
going to build a Grover!

With a couple of death knots hanging the chassis from a water pipe, we had Grovers ass in the air ready to recieve springs.


"Permission to scratch Grover" shouts Dan, holding a large hammer. We knew what needed to happen... I Nodded.... *WHUMP*WHUMP*WHUMP* And the springs were driven home.


After a short debate over which bolt goes where, air tools drove them home.

Lifting the engine was a breeze with the Lever Hoist I splurged on.
If only the garage was taller.
We couldn't quite lift the engine high enough.
So, with a rug over the chassis, we man handled the engine in place.

*S-C-R-A-A-A-T-C-C-C-H*

=( Oh well, had to happen eventually.


The next few hours were filled with me searching the garage for bolts and washers but in the end, Grover is finally a rolling chassis once more. Thanks Dan, Yer a bloody legend!! =D

Wednesday, December 26, 2007

Happy Christmas to Me!

Ive finally realized that Grover may not be a car before 2008... But not to worry, check out how much progress Ive made so far!! =)

The engine got a lick of paint on Christmas eve! Took longer to tape up than to paint.


Axle housings and springs got a tripple coat today.


They look shinier than when they were covered in mud and rust earlier!!


The firewall got sandblasted just before Christmas.


Look at the rust that the sandblasting found!! I chased it around with the MIG set to 1 for about 4 hours!! JOY! =(


After powder coating the firewall looks fantastic! But it didn't cover the rust holes i missed, Oh Well. Better ventilation I guess! =D


Heres the new water pump on the left, and you can see the taper thread that is much better than the silver-solder bung job they did in the original!!


I took the opportunity to paint EVERYTHING since the car was in bits! It just made sense!!


Lucas is the prince of darkness, but I swear this Lucas starter motor will work! First time, every time, guaranteed (fingers crossed!!) Will work even better with its hammer finish paint job!! Awesome!! =D


More misc-bits in various shades of kill rust!


Rear drums had no paint at all, and I sear, this wast the only colour I had!! Fully Sick Bro!! ;-)


Watch this space, there will be a rolling chassis sitting here in a few days, mark my words!!


Onwards and upwards! Kazzar!! =D

Saturday, November 24, 2007

Snowsports and AlcoholicCafinatedBeverages

Hello All, Its been a while since my last post, and while there hasnt been much rover action, there has been action none the less. Heres a brief review of the past few months.

A 4 week holiday in snowy and sheepy New Zealand saw us being van dirtbags for 3 weeks where we did some of the normal tourist'y things, but also bush walked through the alpine region, bouldered (on volcanic plugs on the beach and in limestone roadside caves and at the mecca that is Castle Hill), and mostly camped for free and didnt shower!! Our 3 week van dirtbag holliday was offset with a week of luxury apartment relaxing in wanaka while we learnt to snowboard and ski at Cardrona, Corenet Peak and Trebble Cone! Truly Awesome!! We came home bruised, with big smiles, and feeling very relaxed.

Soon after comming home, I partly tore a tendon in my little finger, which needed rest (no climbing or grover rover). So i went out drinking with the lads from work (Team Building...) and proceeded to write myself off on too many beers, sahki, jaygermiester bombs and vodka and cranbury, waking up the next day with no use of my left arm... seems I fell over in a big way. So Ive been in physio for the past 3 weeks!

Anyway, my arm is kind of working now, and Ive FINNALY got back into the project!! HOORAY! Here's the latest!

My Firewall was baddly rusted, but my donor firewall was not.
However there were 2 things that needed fixing.

This is a door hinge that dad welded back on for me while I was resting my arm.


And here you can see some welding done to the top of the firewall.
This is what the windscreen rests on.


This is the back side of the windscreen mount.
Looks shite but its watretite!! HAHAHA! =)


I quickly butted everything together to make sure it all fitted to the new firewall.
this is the floor pan and seat box butted up to the firewall base.


Here you can see it all fits! Even the windscreen!


Next week the firewall will be sandblasted and powdercoated.

And over the christmas-new-year-break, GROVER WILL LIVE AGAIN!!!

Friday, July 20, 2007

Beer Time

It seems like forever, but Im typing this entry with
a beer, and a grin, because the chassis is black!


Now I have the painting bug!
Before i bolt everything back on, Im going to
consider giveing bits a lick of paint! =D

Sunday, July 8, 2007

Watching Paint Dry

This week sees the ever fearless Rust-Man take a break from
welding and grinding and cutting as he steps forth, bravely, into
a brave new frontier.....

Spray Painting!

The chassis now sits on milk crates and axle stands.
(with tent pegs through the spring hangers).
This makes it easy to spray underneath.

With a few coats of Watyl Kill Rust Etch Primer,
she looks great!! =)


Here's what I've learnt...

30-40psi airflow is all you need for gravity feed
spray gun's. (I started with 100psi and found that
paint drys as it comes out of the gun!!)
Etch primer isn't easy to spray, it is touch dry in
5 minutes, mostly because its about 80% thinners!!

Allow a day for the priming, paint 2-3 thin coats,
sanding lightly between coats (to get the over
spray
off use 240 grade sand paper).

Next, its top coat time!
At this pace I'll have the wheels back on in no time!! =D